Sunday, October 4, 2009

Beautiful Bianca


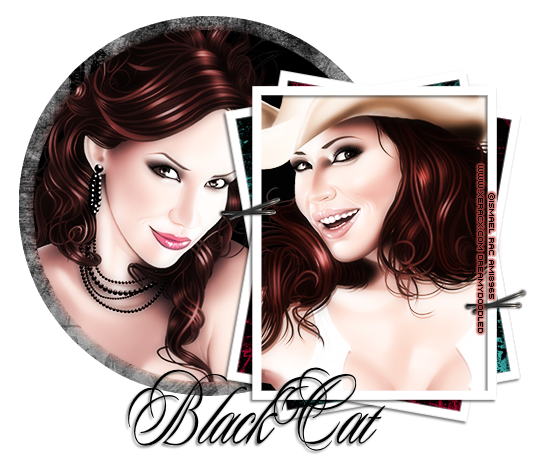
Seems im gonna have to go on the search of a new place to put my tuts yet again.Anyways I have a new tutorial up today using a few of Ismael's new gorgeous images..

Artwork is of course from the fantabulous Ismael Rac who's art you can purchase at Artistic Minds Inc.

Templete comes from Caitlyn of Cupcake Sprinkles you can download this templete as a part of a bundle pack on her blog..Just click on the right handside the link that says Templete Bundle Pack and use templete #1..

Papers of choice..No outside filters where used..Font is called Duet which is a PTU font.

Open all your supplies in PSP. Click on your templete delete the copyright layer..

Highlight rectangle layer 3 click inside of it with your magic wand copy and paste your close up image as a new layer and goto selections invert and hit delete.Duplicate this layer and goto adjust blur gaussian blur set to 5 on your layer pallette change it from normal to either overlay or soft light its your choice which ever you think looks best..

Highlight rectangle layer 2 click inside of it with your magic wand and copy and paste a paper of choice as a new layer.Selections invert and hit delete. Do the same for the rectangle 1 layer using a different paper of choice..

Highlight the circle 1 layer and do the same as the step above using a different paper.

Highlight circle layer 2 click inside of it and goto selections modify and smooth set at 10.Copy and paste a your other close up image as a new layer and goto selections invert and hit delete. Duplicate this layer and goto adjust blur gaussian blur set to 5 and change the layer properties from normal to either overlay or soft light.Which ever looks best to you..

Add a dropshadow to all of the frame layers.

Add your name and copyright and viola your all finished..

Thursday, September 10, 2009


Tutorial was written on September 10th 2009
Artist used is Ismael Rac you can purchase a license to use his artwork thru AMI
Scrapkit is from Kat NKDA you can purchase her Dark Embrace scrapkit from AMI as well.Thanks for a great kit Kat!
Templete is from Melissa of Melissaz Creationz you can download templete #24 from her blog. Thanks for another great templete Melissa!
Wordart of choice or the one I used from Cin at Elegantly Wasted thanks Cin for some fab wordart...
Xero Radiance filter
Font used is Inspiration which is a PTU font...
Ready? Let's Begin
Open all of your supplies in PSP. Click on Melissa's templete and delete the copyright layer.Highlight the lg circle layer and click inside of it with your magic wand.Goto selections modify and smooth set at 10 and copy and paste a paper from your kit as a new layer.Selections invert and hit delete. You can delete the original lg circle layer..
Highlight the lg circle frame and click on it with your magic wand and goto selections modify smooth set to 10 and copy and paste a different paper from your kit as a new layer.Selections invert and hit delete..
Hightlight the scalloped frame layer and repeat the step above using different paper from your kit..
Add any embelishments of your choice from your kit and add a dropshadow to each..
Delete square 3 & frame 3..
Highlight square 1 layer and click on it with your magic wand and flood fill it with black do the same for the square 2 layer.Keep selected paste your main image as a new layer and place it inside the marching ants where you think it looks best.Selections invert and hit delete.Duplicate your tube image layer and on the copied layer goto adjust blurr gaussian blur set to either 3 or 5 which ever you think looks best.On the original layer goto xero radience and use the default settings. Do the same for the sqaure 2 layer..
Paste your main image as a new layer and resize if needed.Duplicate the layer and goto adjust blur gausssian blur set at either 3 or 5 its your choice. On the orignal add a xero radiance to it using the default settings..
Add your name and copyright information and viola your finished..
I hope you enjoy this tutorial as much as I did writting it..

Since My Site

Decided to want to go wonky on me im going to add my newest tut here..That will teach them to mess wiff me when im on a roll lol..

Tuesday, March 31, 2009


You can find this new tutorial Blue Eyes here

2 New Tutorials


You can find my BFF tutorial here


Monday, February 23, 2009

I've been challenged by Sara


Sara from Sara's Scraps challenged me a few days ago but with my knee surgery I havent been able to sit at the pc for long periods of time.So I figured while it was hurting to much i'd come and get the challenged posted...


The Challenge is:go to your picture folder on your computer.Find the 6th folder.Go to the 6th picture of the 6th folder.Post the picture on your blog and describe it.Pass the challenge on to 6 friends.Link to them on your blog and let them know they've been challenged.


Here is mine
Its a picture of all the kids between hubby & his brother & sister all the mother in law's grandkids.Was taken last year at brother in laws house.There are few of his cousins & there kids in there aswell but there like neices and nephews and grands anyways...

Now to challenge 6 people hmmmmm

1st is Jessica from Gothic Inspirationz
2nd is Rachel from Captivated Visions
3rd is Tamara from Just a Girl Designs
4th is Missy from Scraps With Attitude
5th is Tammy from Jersey Girl Scraps by Tammy
6th is Melissa from Melissa's Creationz

Tuesday, February 3, 2009

4 New Tutorials


And here is number 4 and you can find it here